


A new month is upon us, which means it’s the perfect time for new learning opportunities to share with your students! Here is our collection of engaging themed content for May:
Spring Gallery Pack: Spring is in full swing, and this MimioStudio Gallery pack is filled with images, backgrounds, lessons, and activities to help you bring some spring magic to your classroom.
Spring Backgrounds: Add a pop of spring to your lessons with these fun spring-themed backgrounds. You can even make them your own by inserting a text box, changing the transparency, or adding a shape.
If you enjoyed the above content, consider joining our MimioConnect interactive teaching community to access more of our valuable lesson content and resources. Click here to register today!
Mastering the MimioStudio Toolbar
MimioStudio has many features and tools, giving teachers a great opportunity to hook students. While presenting a lesson, you may find yourself needing to focus student attention on one area of your screen. Or, you may have various pieces of information that you want to show in stages. There are many wonderful presentation tools that are built in and at the ready to help in your journey of mastering all things Mimio.
 Using Reveal and Spotlight Within (and Beyond!) MimioStudio
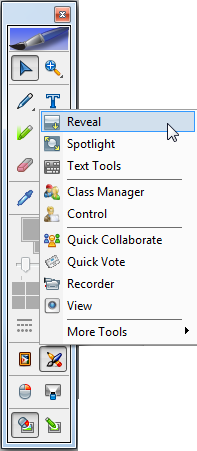 The Reveal and Spotlight tools can be used with anything you present on your computer—Mimio files, websites, movie clips, PowerPoint files, documents, etc. These tools are found under the Applications button on the MimioStudio Toolbar.
The Toolbar is a standalone application that can be used in many ways. Once it’s open, you have the ability to access many of the built-in features. The Reveal tool replaces the old-school method of putting a piece of paper on top of something you may have presented on an overhead projector. When the Reveal tool has been activated, you’ll see a grey screen with directional arrows take over your entire screen. Depending on which arrow you click and slide, you’ll be able to uncover lesson material from either top to bottom, bottom to top, left to right, or right to left. The Reveal shade begins with 0% transparency. However, using options available in the top right menu, you can change to make the shade more transparent.
Along the same lines, selecting the Spotlight tool will create a spotlight area that can be moved around to focus on any area of your screen. By clicking outside the Spotlight area and dragging with your stylus, you'll be able to move the spotlight to focus on any area. By clicking and dragging on the spotlight border, you can change the size of the shape. Once again, you have other options that you can change regarding the spotlight tool once you click on the options menu found on the top right of the spotlight screen. You’ll be able to change the transparency of the background shade, the size of the spotlight area, as well as choose between other spotlight shapes including star, square, rounded square, rectangle, and rounded rectangle.
There are many ways to use this fun tool to make simple lessons more engaging and interactive. For example, a science teacher may have a website showing a periodic table image and ask students to come to the board and use the rectangle spotlight tool to focus in on a metal or non-metal. A math teacher could use the rectangle spotlight tool to focus on each step of a multi-step problem. A language arts teacher could display a reading passage and have students use a spotlight tool to focus on main parts of the passage, or even use the reveal tool to guide an out-loud reading of a selected area. Like most tools found in MimioStudio, the power of each one is in how imaginative you can be.
Learn more about these tools in our upcoming “MimioStudio: Presenting Lessons” Quick Learn sessions on May 11 at 8:00pm and May 30 at 7:00pm.
Capture Content With the Screen Clipping Tool  When I work with teachers on the benefits of thinking outside the box to create engaging and interactive lessons, there are many tools that Mimio brings to the table that make it easy. One of my all-time favorite tools—and one that I use for all sorts of things—is the Screen Clipping tool. This tool allows you to capture anything on your screen and clip it out to use in anything you want, including Mimio, websites, PowerPoint, GoogleDocs, and more. Windows users have a similar tool, but the convenience of the Screen Clipping tool right by my side as I use the MimioStudio software makes it number one in my book! This gem is found within the MimioStudio Toolbar and will be an option when you click the Insert Tool button.
Once you select Screen Clipping, your screen will turn grey, giving your four options of how to clip at the top of your screen. You will be able to clip a rectangular, ellipse, or free-form drawing shape, or you can clip the entire screen. Personally, I like to use the rectangle option most, but the free-form option is a close second and very useful. Once you make your choice, you’ll then use your Mimio stylus or mouse to draw around the area you want to clip. When you pick up the stylus or release your mouse, the area will be clipped and automatically pasted into a MimioStudio Notebook page as a single graphic. You’ll then be able to manipulate the graphic, save it, or copy/paste into any other application you choose. I find myself using this tool to clip pieces of just about anything I find, such as important tables, graphics for other presentations, or quotes to add them to various presentations or documents I create for staff. If you haven’t used the Screen Clipping tool yet, it will be life changing!
See how to use this tool in lessons and learn from other teachers in our upcoming “MimioStudio: Adding Content” Quick Learn sessions on May 3 at 8:00pm and May 22 at 7:00pm.
This is just the beginning of the incredible set of tools available to you within MimioStudio. Interested in checking out more of the Quick Learn sessions offered this month? Click here to view our complete list!


