We all want to create fun lessons and activities that make learning engaging and interactive for our students. However, we don’t want it to take forever or be overly complicated. That’s why I use MimioStudio™ classroom software, which conveniently works with any projector or interactive display. Whether you are using the MimioTeach portable IWB and your existing projector, an interactive projector, ProColor Display, etc., it just works. MimioStudio software is the powerhouse behind it all and is designed with the teacher in mind to be easy to use, intuitive, and powerful.
MimioStudio Software Really Is So Simple to Use
In fact, you can learn five easy, yet powerful, tools in MimioStudio in a snap! New to MimioStudio and just not sure where to start? Let me show you some simple tools that you can start using in your classroom today:
 Let’s start by inserting a Word or PDF document with your content already on it into MimioStudio software. It’s easy—just follow me:
- Click on the Insert menu on the top
- Select Insert File
- Navigate to where your Word doc is saved and select the file
- Click Open and watch it load into your MimioStudio software
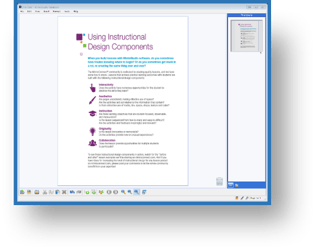
Here’s mine. Does yours look something like this? Now let’s use five Mimio tools to work with it.
Tool #1: Pen Tool

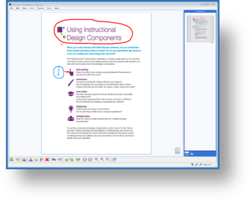
 The Pen tool is super easy to use. When you click on the Pen tool on the MimioStudio floating toolbar, you will notice that the color palette below becomes active. You can click on the color of your choice from the palette, then use the thickness slider to make your pen tip thicker or thinner. Now you are ready to write or draw! Simply touch your stylus (if you are using MimioTeach or an interactive projector) or your finger (if you have a touch screen), and write or draw away. Circle text, draw a picture, solve a math problem, or write notes—just like you would with a regular pen. Notice on my sample page that I circled the title in red.
Tool #2: Highlighter Tool
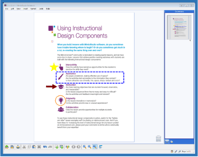
 The Highlighter tool is exactly what it sounds like: a highlighter. Just like the Pen tool, when you click on the Highlighter tool on the MimioStudio floating toolbar, you will notice that the color palette below becomes active. You can click on the color of your choice from the palette, use the thickness slider to make your highlighter tip thicker or thinner, then highlight away. How fun to have so many colors to choose from! Think about how often you will use the highlighter to accentuate parts of a slide for your students or have them find and highlight the main idea, parts of speech, or a definition. On my sample page, I highlighted the names of all of the designs components with the yellow highlighter.
Tool #3: Eraser Tool
I don’t know about you, but I make mistakes every now and again, so I love the Eraser tool. This tool allows you erase anything you have written with the pen or highlighter tools. When you click on the eraser, you will notice that the thickness slider becomes active. Depending on what you need to erase, you can make the eraser larger or smaller. Once you have chosen the eraser and the thickness, it’s easy to use your stylus (if you are using MimioTeach or an interactive projector) or your finger (if you have a touch screen) to fix that mistake before anyone sees it.
Tool #4 Selection Tool
 The Selection tool is your mouse tool. Click on the Selection tool on the toolbar—you can now click on any object on your screen to select it so that you can move, size, modify, or delete it. Once you click on an object and select it, all tools for that object become active again.
Tool #5: Shape Tool
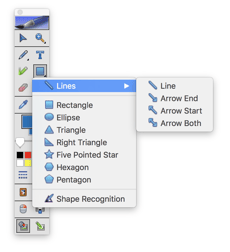
 The Shape tool gives you so many choices of shapes to create. Right click on the shape tool and you will get a pop-out menu. Click on the shape that you want and you’ll notice that the color palette below becomes active. If you click on the box on the top in the color palette, you can change the outline color, thickness, outline style, or transparency. Click on the bottom box and you can change the fill color and transparency. Now that you have selected your shape and attributes, place your cursor on the screen and click and drag until you have the desired size. Want to modify your shape? Just click on the Selection tool on the toolbar and then click on the shape you created. The palette will be active again and you can change the border or the fill to make it just the way you want, or even drag the corners to resize it.
And There You Have It—Five Tools in Five Minutes!
Once you have the basic tools down, it’s time to think about how to use MimioStudio lessons in your classroom. Two great ideas are for collaboration and assessment—MimioStudio lessons offer such versatility. Your lesson may include the opportunity for your students to work collaboratively in small groups at the computer or with a device through the MimioMobile app. MimioStudio’s built-in question templates allow you to embed questions directly into your lesson so that you can check for understanding along the way and modify your instruction as needed. These are just a few of the ways that you can get started with MimioStudio software today!
Want to try it out for yourself? You can with a 30-day free trial. See what you can create in just five minutes!


